2013.12.02

CloudTrailのデータをまとめて表示してみた

CloudTrailのデータは日次でディレクトリが作成された中に保存されるので、面倒なのでCLI使ってまとめて表示してみた。

$ bucket_name=[bucket_name] ;mkdir /tmp/trail-temp 2>/dev/null; aws s3 sync s3://${bucket_name} /tmp/trail-temp > /dev/null; find /tmp/trail-temp -type f -name "*.json.gz" | xargs -i gzip -cd {} | sed "s/\]}{\"Records\":\[/,/g"

一番最初の[bucket_name]だけCloudTrailの保存先に指定しているbucket名を指定して使います。

これでだらだらJSONが表示されるのでpytnonのjson.toolなんかを利用するとフォーマットされます。

$ bucket_name=[bucket_name] ;mkdir /tmp/trail-temp 2>/dev/null; aws s3 sync s3://${bucket_name} /tmp/trail-temp > /dev/null; find /tmp/trail-temp -type f -name "*.json.gz" | xargs -i gzip -cd {} | sed "s/\]}{\"Records\":\[/,/g" | python -m json.tool

DBとかにつっこんで利用する方法、まで書ければかっこよかったんですが
僕の場合ファイルに出力してvimで検索して満足したんで、これで終わりです。

2013.11.22

Instanceから作成したAMIの中で最新のAMI IDを取得してみた

タイトルの通りです。

使うときは一番最初のechoで出力するインスタンスIDを検索したいIDに書き換えて使います。

$ echo [インスタンスID] | xargs -i aws --output text ec2 describe-instances --instance-ids {} | awk 'BEGIN{FS="\t"} {if($1=="INSTANCES") {rootdev=0;vol="";dev=$17;} if($1=="BLOCKDEVICEMAPPINGS") {if($2==dev) rootdev=1; else rootdev=0;} if($1=="EBS" && rootdev==1) vol=$5;} END{print vol}' | xargs -i aws --output text ec2 describe-snapshots --filters Name=volume-id,Values={} | sort -t$'\t' -k 6 -r | head -n 1 | cut -f5 | xargs echo | sed 's/ /,/g' |  xargs -i aws --output text ec2 describe-images --filters Name=block-device-mapping.snapshot-id,Values={} | awk 'BEGIN{FS="\t"} {if($1=="IMAGES") print $5;}'

ちなみに指定したInstanceから作成したAMI IDの一覧を出力するには

$ echo [インスタンスID] | xargs -i aws --output text ec2 describe-instances --instance-ids {} | awk 'BEGIN{FS="\t"} {if($1=="INSTANCES") {rootdev=0;vol="";dev=$17;} if($1=="BLOCKDEVICEMAPPINGS") {if($2==dev) rootdev=1; else rootdev=0;} if($1=="EBS" && rootdev==1) vol=$5;} END{print vol}' | xargs -i aws --output text ec2 describe-snapshots --filters Name=volume-id,Values={} | cut -f5 | xargs echo | sed 's/ /,/g' |  xargs -i aws --output text ec2 describe-images --filters Name=block-device-mapping.snapshot-id,Values={} | awk 'BEGIN{FS="\t"} {if($1=="IMAGES") print $5;}'

さすがにこれはscriptで書いた方がもっと出力工夫できた
と思いつつも後悔はしていない。

2013.11.21

AWS OpsWorksのゴミを削除してみた

AWS OpsWorksを使うとStackを削除しても大量のSecurityGroupのゴミが残ります。
Nameが”AWS-OpsWorks-“で始まるゴミたちです。
やっかいなことにこれらのSecurityGroup同士が依存しあっているため(他のSecurityGroupがSourceに指定されている)手動で消すのは折れない心が無い限り無理です。

ということでAWS CLIを使って削除するコマンドを作ってみました。
regionやAccessKeyはconfigで指定されている前提です。

$ aws --output text ec2 describe-security-groups --filters Name=group-name,Values="AWS-OpsWorks-*" | awk 'BEGIN{FS="\t"; count=0; sg_cmd="aws ec2 delete-security-group --group-id "; ing_cmd="aws ec2 revoke-security-group-ingress"} {if($1=="SECURITYGROUPS") {sg="";pfrom=="";pto="";proto="";source="";sg=$3;sg_list=sg_list "\n" sg_cmd sg} if($1=="IPPERMISSIONS"){pfrom=$2;pto=$4;proto=$3;} if($1=="USERIDGROUPPAIRS") {source=$2;count=count+1;ingress_list[count]=ing_cmd " --group-id " sg " --source-group " source " --protocol " proto " --port " pfrom; if(pto!="-1") ingress_list[count]=ingress_list[count] "-" pto}} END{for(i in ingress_list) print ingress_list[i]; print sg_list}'

内容としてはこんな感じです。

・SecurityGroupのNameの先頭に「AWS-OpsWorks-」が付いているものをリストアップ
・リストアップされたSecurityGroupのInboudで、Sourceに他のSecurityGroupが指定されているルールを削除
・リストアップされたSecurityGroupを削除

上記コマンドを実行すると削除コマンドが標準出力に出力されます。

こんな感じ。

aws ec2 revoke-security-group-ingress --group-id sg-f1637593 --source-group sg-f4637596 --protocol tcp --port 1-65535
aws ec2 revoke-security-group-ingress --group-id sg-f1637593 --source-group sg-ef63758d --protocol udp --port 1-65535
aws ec2 revoke-security-group-ingress --group-id sg-f1637593 --source-group sg-ec63758e --protocol udp --port 1-65535
aws ec2 revoke-security-group-ingress --group-id sg-f1637593 --source-group sg-e963758b --protocol udp --port 1-65535
~~中略~~
aws ec2 delete-security-group --group-id sg-f7637595
aws ec2 delete-security-group --group-id sg-ef63758d
aws ec2 delete-security-group --group-id sg-e863758a
aws ec2 delete-security-group --group-id sg-f1637593

なので結果を確認して問題なければ出力をパイプで”sh”に渡してあげると実行できます。

$ aws --output text ec2 describe-security-groups --filters Name=group-name,Values="AWS-OpsWorks-*" | awk 'BEGIN{FS="\t"; count=0; sg_cmd="aws ec2 delete-security-group --group-id "; ing_cmd="aws ec2 revoke-security-group-ingress"} {if($1=="SECURITYGROUPS") {sg="";pfrom=="";pto="";proto="";source="";sg=$3;sg_list=sg_list "\n" sg_cmd sg} if($1=="IPPERMISSIONS"){pfrom=$2;pto=$4;proto=$3;} if($1=="USERIDGROUPPAIRS") {source=$2;count=count+1;ingress_list[count]=ing_cmd " --group-id " sg " --source-group " source " --protocol " proto " --port " pfrom; if(pto!="-1") ingress_list[count]=ingress_list[count] "-" pto}} END{for(i in ingress_list) print ingress_list[i]; print sg_list}' | sh -x

これで僕の環境はきれいになりました。

あとIAM Roleにも”aws-opsworks-“なゴミが2つくらいいたので、これは手動で削除しました。

2013.10.17

IAMを使ってAWS Management Consoleから特定のBucketのみ操作を許可する方法

前に書いた『IAMを使って特定の人に特定のbucketのみ操作を許可する』は操作だけの話だったんですが
AWS Management Consoleを使おうとしたらハマったのでメモ。

  1. IAMでユーザ作成。
  2. ユーザのポリシーに以下を指定
{
  "Version": "2012-10-17",
  "Statement": [
    {
      "Action": [
        "s3:ListAllMyBuckets"
      ],
      "Sid": "Stmt1382001691000",
      "Resource": [
        "*"
      ],
      "Effect": "Allow"
    },
    {
      "Action": [
        "s3:ListBucket",
        "s3:GetBucketLocation"
      ],
      "Sid": "Stmt1382001709000",
      "Resource": [
        "arn:aws:s3:::hoge-bucket"
      ],
      "Effect": "Allow"
    },
    {
      "Action": [
        "s3:*"
      ],
      "Sid": "Stmt1382001730000",
      "Resource": [
        "arn:aws:s3:::hoge-bucket/*"
      ],
      "Effect": "Allow"
    }
  ]
}

以上。

ハマったところは
“arn:aws:s3:::hoge-bucket”に対する操作に”s3:ListBucket”を指定するよう書いてるサイトが多いんですが
試したところ、これだけだとバケットを開こうとすると
“Sorry! You were denied access to do that.”
とエラーメッセージが出ます。
AWS Management Consoleでアクセスできるようにするには
“s3:GetBucketLocation”も追加すると操作できるようになりました。

2013.07.18

今度こそUbuntu 64bit で Canon IR5055N を使いつつ今度はセキュアプリントも使う

過去にUbuntu 64bit で Canon IR5055N を使うでプリンタドライバのインストールを書きましたがたぶん色々間違ってました m(. . )m

その後検証したところによるとmakeではインストールされるライブラリが足りないため
cndrvcups-lips4.specを読んで必要な処理を手動で行う必要があったようです。

ただそれも今となっては過去の話。
LIPS4(LIPSLX) Printer Driver for Linux Version 2.60 ではrpmだけではなく64bit Debianパッケージも同梱されています。

ということで必要なパッケージをダウンロードしてインストール。
LIPS4 Printer Driver for Linux Version 2.60 32bit
LIPSLX Printer Driver for Linux Version 2.60 64bit
LIPS4 Printer Driver for Linux Version 2.60 64bit

僕は今回 LIPSLX Printer Driver for Linux Version 2.60 64bit を使ったのでその前提で進めます。
※LISPLXの場合ドライバ検索でiR5055が自動でヒットしたのでこちらを使いました。

$ tar xzvf llinux-lips4-printerdriver64-v260.tar.gz
$ cd linux-lipslx-printerdriver64-v260/64-bit_Driver/Debian/
$ sudo dpkg -i cndrvcups-common_2.60-1_amd64.deb cndrvcups-lipslx_2.60-1_amd64.deb
Selecting previously unselected package cndrvcups-common.
(Reading database ... 323489 files and directories currently installed.)
Unpacking cndrvcups-common (from cndrvcups-common_2.60-1_amd64.deb) ...
Selecting previously unselected package cndrvcups-lipslx.
Unpacking cndrvcups-lipslx (from cndrvcups-lipslx_2.60-1_amd64.deb) ...
Setting up cndrvcups-common (2.60-1) ...
Setting up cndrvcups-lipslx (2.60-1) ...

完了です。
あとは
[System Settings] -> [Printers] -> [Add]
でプリンタをインストールしてあげてください。

ちなみにCanon IR5055Nは対応プロトコルとして下記が記載されていました。

TCP/IP(LPD/Port9100/WSD/IPP/IPPS/SMB/FTP)、IPX/SPX(NDS、Bindery)、AppleTalk

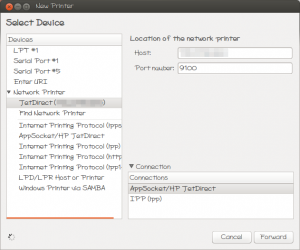
なのでネットワークプリンタの場合IPを指定して検索すると
「App Socket/HP JetDirect」が選択されPortNumber 9100がデフォルトで入力されますが
この設定がこのまま使えるようです。
プリンタの追加
あとは「次へ」押したり名前つけたりしてあげるとインストール完了です。


ここからはついでのセキュアプリント。

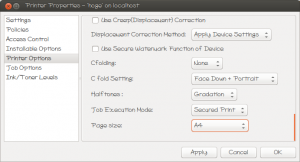
まずはプリンタのプロパティを開きます。
[System Settings] -> [Printers] -> 作成したプリンタ右クリック -> [Properties]
左の項目から”Printer Options”を選択し、右画面を一番下までスライドさせて
[Job Execution Mode] -> “Secured Print”を選択
Printer Properties

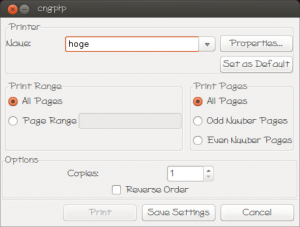
プロパティ変更後コマンドラインから下記コマンドを実行することでプリンタの設定画面が開きます。

$ cngplp

cngplp
[Properties] -> [Device Settings] を開いていき
[Output Method] -> “Secure Print”を選択
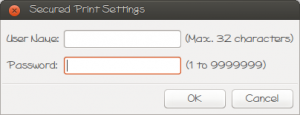
[Settings]をクリックするとユーザ名とパスワードを入力する画面が出てきます。
Secured Print Settings

ここでユーザ/パスを設定してアプリケーションから印刷を行えば、セキュアプリントを利用することが可能でした。

今度こそ大丈夫。

2013.06.06

Ubuntu 12.04にZabbix 2.0をインストールしてみた

参考サイト https://www.zabbix.com/documentation/2.0/manual/installation/install
Package Download http://www.zabbix.com/download.php

Ubuntu 12.04 ServerにZabbix 2.0.6をインストールしましたメモ。

基本的にはインストールドキュメントの通り。
パッケージは10.04版しか見つからなかったのでソースからインストールしました。

まずはダウンロードと展開。

$ wget -P /tmp http://downloads.sourceforge.net/project/zabbix/ZABBIX%20Latest%20Stable/2.0.6/zabbix-2.0.6.tar.gz
$ cd /opt
$ tar xzvf /tmp/zabbix-2.0.6.tar.gz
$ ln -s /opt/zabbix-2.0.6 /opt/zabbix

コンパイル用にgcc、DBにはMySQLを使うのでインストール。

$ sudo apt-get install gcc mysql-server

configureを実行。

$ ./configure --enable-server --enable-agent --with-mysql --with-net-snmp --with-libcurl

するとmysql_configが足りないって言われる。

そんな子どこにいるのかわからないのでauto-aptで探してみてインストール。

$ apt-get install auto-apt
$ sudo auto-apt update
$ auto-apt search mysql_config
usr/bin/mysql_config_pic    libdevel/libmysqld-pic
usr/bin/mysql_config    libdevel/libmysqlclient-dev
$ sudo apt-get install libmysqlclient-dev

2回目のconfigure

$ ./configure --enable-server --enable-agent --with-mysql --with-net-snmp --with-libcurl

今度はcurl-configが足りないって言われる。

検索、そしてインストール。

$ auto-apt search curl-config
usr/bin/flickcurl-config    universe/libdevel/libflickcurl-dev
usr/bin/curl-config libdevel/libcurl4-gnutls-dev,libdevel/libcurl4-nss-dev,libdevel/libcurl4-openssl-dev
$ sudo apt-get install libcurl4-openssl-dev

3回目のconfigure

$ ./configure --enable-server --enable-agent --with-mysql --with-net-snmp --with-libcurl

次はnet-snmp-configが足りないって言われる。

検索、そしてインストール。

$ auto-apt search net-snmp-config
usr/bin/net-snmp-config libs/libsnmp15
$ sudo apt-get install libsnmp15

4回目のconfigure

$ ./configure --enable-server --enable-agent --with-mysql --with-net-snmp --with-libcurl
[中略]
checking for main in -lnetsnmp... no
configure: error: Not found NET-SNMP library

次はnetsnmpのライブラリが無いって言われる。

こいつは勘でインストール。

$ sudo apt-get install libsnmp

5回目のconfigure

$ ./configure --enable-server --enable-agent --with-mysql --with-net-snmp --with-libcurl
[中略]
***********************************************************
*            Now run 'make install'                       *
*                                                         *
*            Thank you for using Zabbix!                  *
*              <http://www.zabbix.com>                    *
***********************************************************

通った。

$ make
$ sudo make install

通った。

DBの作成。

$ mysql -u root -p <<EOF
> create database zabbix character set utf8;
> EOF
$ mysql -u root -p zabbix < database/mysql/schema.sql
$ mysql -u root -p zabbix < database/mysql/images.sql
$ mysql -u root -p zabbix < database/mysql/data.sql

zabbixサーバのDB接続情報設定の変更。

$ sudo vim /usr/local/etc/zabbix_server.conf

DBUser=root
DBPassword=password        <-- DBサーバに設定したrootのパスワードを指定

管理画面となるWEBのインストール。

$ sudo apt-get install apache2 libapache2-mod-php5
$ mkdir /var/www/zabbix
$ cd frontends/php $ cp -a . /var/www/zabbix

ブラウザでzabbixの画面を開いてみて確認。
-> http://zabbix/pre-requisites
初期設定画面で設定変更が必要な箇所がわかるのでそれぞれ修正。
僕が変更したのは以下。

$ sudo vim /etc/php5/apache2/php.ini

post_max_size = 16M
max_execution_time = 300
max_input_time = 300
data.timezone = Asia/Tokyo

$ sudo apt-get install php5-mysql
$ sudo apt-get install php5-gd

$ sudo service apache2 reload

これでリロードすれば全部OKになった。
ならない人は必要に応じて追加で設定/インストールどうぞ。

初期設定画面の最後まで行くとconfigファイルの画面が出てくるので
ダウンロードしてzabbixサーバの/var/www/zabbixにコピー。

とりあえずここまでで起動完了。

==================================================
ついでに日本語化の方法。

$ sudo locale-gen ja_JP.UTF-8
$ cd /var/www/zabbix/locale
$ ./make_mo.sh

zabbixの管理画面の[profile]からlanguageを変更して完了。

==================================================
おまけにその他ノードにエージェントだけ追加したい場合。

$ wget -P /tmp http://downloads.sourceforge.net/project/zabbix/ZABBIX%20Latest%20Stable/2.0.6/zabbix-2.0.6.tar.gz
$ cd /opt
$ sudo chmod o+w .
$ tar xzvf /tmp/zabbix-2.0.6.tar.gz
$ ln -s /opt/zabbix-2.0.6 /opt/zabbix
$ cd zabbix/
$ sudo apt-get -y install gcc
$ ./configure --enable-agent
$ make
$ sudo make install
$ sudo sed  -i -e 's/Server=127.0.0.1/Server=[server-ip-address]/' /usr/local/etc/zabbix_agentd.conf
$ zabbix_agentd

以上!

2013.05.27

OpenStack構築後にCPU負荷が異様に高まったのでその対応

OpenStackは以下を参考にインストール。
http://docs.openstack.org/grizzly/basic-install/apt/content/

インストールバージョンはgrizzly。
OSはUbuntu12.04。
コントローラノード1台、ネットワークノード1台、コンピュータノード2台の構成。

で、インストール後管理画面を開くと異様に遅いOpenStackが。

とりあえずvmstatで状況を確認。

hoge@fuga:~$ vmstat 1
procs -----------memory---------- ---swap-- -----io---- -system-- ----cpu----
 r  b   swpd   free   buff  cache   si   so    bi    bo   in   cs us sy id wa
 1  1  34888  73116  35168 881976    0    0  2151   139   83    6  6  1 51 41
 0  1  34888  68032  35200 887116    0    0  5068    76  638 1142  4  1 48 47
 1  0  34888  75720  35144 879248    0    0  6944    48  580 1052  3  1 49 48
 0  1  34888  72124  35144 882692    0    0  4816     0  316  653  1  1 50 49
 2  0  34888  67412  35184 887384    0    0  4736   828  576 1058  3  1 48 48
 0  1  34888  74232  35168 880540    0    0  5580    64 1149 2193  7  1 45 46
 0  1  34888  70512  35192 884328    0    0  3712    80  885 1625  5  1 45 49
 0  1  34888  65428  35200 889336    0    0  5008    24  473  899  2  1 45 53
 0  1  34888  73240  35120 881360    0    0  5872    28  458  847  2  1 51 47
 0  1  34888  68776  35160 885860    0    0  4480   104  672 1174  4  1 40 56
 0  1  34888  64808  35176 889948    0    0  4016    52  547 1064  3  1 49 48
 0  1  34888  72124  35148 882600    0    0  5120     0  300  638  1  0 50 49
 0  1  34888  66420  35148 888280    0    0  5664     0  310  627  1  1 50 49
 0  1  34888  75100  35100 879676    0    0  3760    52 1135 2110  9  1 42 49
 0  1  34888  71504  35180 883196    0    0  3620  1052 1161 2023  6  2 43 50

CPUのwaitが高過ぎますね。

hoge@fuga:~$ top

top - 14:37:50 up 2 days, 21:56,  1 user,  load average: 1.67, 1.54, 1.46
Tasks: 138 total,   2 running, 136 sleeping,   0 stopped,   0 zombie
Cpu(s):  3.8%us,  1.0%sy,  0.0%ni, 47.8%id, 47.3%wa,  0.0%hi,  0.2%si,  0.0%st
Mem:   2050020k total,  1977740k used,    72280k free,    23848k buffers
Swap:  2097148k total,    34888k used,  2062260k free,   894848k cached

  PID USER      PR  NI  VIRT  RES  SHR S %CPU %MEM    TIME+  COMMAND
 1436 mysql     20   0 1310m 191m 3928 S    2  9.6 100:21.52 mysqld
 1996 rabbitmq  20   0 1139m 106m 1844 S    2  5.3  97:33.42 beam.smp
 1341 quantum   20   0  186m  39m 3748 S    1  2.0 100:18.12 python
 1345 cinder    20   0 91428  19m 3324 S    1  1.0  22:43.32 cinder-volume
 1362 nova      20   0  213m  49m 3712 S    0  2.5   1:44.69 nova-consoleaut
 1397 cinder    20   0  197m  35m 3672 S    0  1.8   2:20.62 cinder-schedule
    1 root      20   0 24584 2156 1132 S    0  0.1   4:37.98 init

load averageも高い。動いてるのは強いて言えばmysqldぽい。
beam.smpは見かけない子なのでググってみるとRabbitMQの関係の子らしい。特に原因には関係ないぽい。

ひたすらwaitなのでIOも確認してみる。

hoge@fuga:~$ sudo iotop
Total DISK READ:       4.95 M/s | Total DISK WRITE:     144.30 K/s
  TID  PRIO  USER     DISK READ  DISK WRITE  SWAPIN     IO>    COMMAND
22748 be/4 mysql       4.78 M/s    0.00 B/s  0.00 % 96.90 % mysqld
 2227 be/4 rabbitmq    0.00 B/s    7.80 K/s  0.00 % 17.65 % beam.smp -W w -K true -A30 -P 1048576 --~ir "/var/lib/rabbitmq/mnesia/rabbit@fuga"
27136 be/4 www-data    0.00 B/s    0.00 B/s  0.00 %  0.00 % apache2 -k start
    1 be/4 root        0.00 B/s    0.00 B/s  0.00 %  0.00 % init
    2 be/4 root        0.00 B/s    0.00 B/s  0.00 %  0.00 % [kthreadd]
    3 be/4 root        0.00 B/s    0.00 B/s  0.00 %  0.00 % [ksoftirqd/0]

mysqldが犯人で確定。

mysqlが何してるのか確認してみる。

mysql> show processlist;
+------+----------+-----------+----------+---------+------+--------------+------------------------------------------------------------------------------------------------------+
| Id   | User     | Host      | db       | Command | Time | State        | Info                                                                                                 |
+------+----------+-----------+----------+---------+------+--------------+------------------------------------------------------------------------------------------------------+
| 1923 | quantum  | localhost | quantum  | Sleep   |    1 |              | NULL                                                                                                 |
| 1924 | nova     | localhost | nova     | Sleep   |    1 |              | NULL                                                                                                 |
| 1925 | nova     | localhost | nova     | Sleep   |    1 |              | NULL                                                                                                 |
| 1926 | nova     | localhost | nova     | Sleep   |    6 |              | NULL                                                                                                 |
| 1927 | cinder   | localhost | cinder   | Sleep   |    3 |              | NULL                                                                                                 |
| 1928 | cinder   | localhost | cinder   | Sleep   |    7 |              | NULL                                                                                                 |
| 1929 | nova     | localhost | nova     | Sleep   |   11 |              | NULL                                                                                                 |
| 1931 | nova     | localhost | nova     | Sleep   |    7 |              | NULL                                                                                                 |
| 1932 | nova     | localhost | nova     | Sleep   |    7 |              | NULL                                                                                                 |
| 1933 | quantum  | localhost | quantum  | Sleep   |    1 |              | NULL                                                                                                 |
| 1935 | quantum  | localhost | quantum  | Sleep   |    1 |              | NULL                                                                                                 |
| 1936 | quantum  | localhost | quantum  | Sleep   |    0 |              | NULL                                                                                                 |
| 1938 | nova     | localhost | nova     | Sleep   |   16 |              | NULL                                                                                                 |
| 1939 | nova     | localhost | nova     | Sleep   |    6 |              | NULL                                                                                                 |
| 1946 | quantum  | localhost | quantum  | Sleep   |    2 |              | NULL                                                                                                 |
| 1949 | nova     | localhost | nova     | Sleep   |    1 |              | NULL                                                                                                 |
| 1950 | keystone | localhost | keystone | Query   |  238 | Sending data | SELECT token.id AS token_id, token.expires AS token_expires, token.extra AS token_extra, token.valid |
| 1951 | root     | localhost | NULL     | Query   |    0 | NULL         | show processlist                                                                                     |
+------+----------+-----------+----------+---------+------+--------------+------------------------------------------------------------------------------------------------------+

keystoneがデータを送り続けてるらしい。

keystoneのログを見てみる。

root@fuga:/var/log/keystone# tail -f keystone.log
2013-05-27 14:50:00     INFO [sqlalchemy.engine.base.Engine] SELECT role.id AS role_id, role.name AS role_name, role.extra AS role_extra_
FROM role_
WHERE role.id = %s_
 LIMIT %s
2013-05-27 14:50:00     INFO [sqlalchemy.engine.base.Engine] ('bc1d3f04415a4feb89fee7ad327a9f6b', 1)
2013-05-27 14:50:00    DEBUG [keystone.policy.backends.rules] enforce admin_required: {'tenant_id': u'b1493d6491b54dcabb33792632df4945', 'user_id': u'6b06407ab6be40c7a90185774d082921', u'roles': [u'_member_', u'admin']}
2013-05-27 14:50:00     INFO [sqlalchemy.engine.base.Engine] SELECT token.id AS token_id, token.expires AS token_expires, token.extra AS token_extra, token.valid AS token_valid, token.user_id AS token_user_id, token.trust_id AS token_trust_id_
FROM token_
WHERE token.expires > %s AND token.valid = %s
2013-05-27 14:50:00     INFO [sqlalchemy.engine.base.Engine] (datetime.datetime(2013, 5, 27, 5, 50, 0, 186563), 0)

確かにkeystoneが投げてるクエリっぽい。

mysqlに入って実行してみる。

mysql> SELECT token.id AS token_id, token.expires AS token_expires, token.extra AS token_extra, token.valid AS token_valid, token.user_id AS token_user_id, token.trust_id AS token_trust_id  FROM token  WHERE token.expires > '2013-05-27 06:11:45' and token.valid = 0;
Empty set (4 min 44.50 sec)

5分近くかかってる。こいつがつまってそう。

レコード数を確認してみる。

mysql> select table_name,table_rows,data_length/1024/1024 as 'data/MB',index_length/1024/1024 as 'index/MB' from information_schema.TABLES where table_schema='keystone';
+------------------------+------------+---------------+------------+
| table_name             | table_rows | data/MB       | index/MB   |
+------------------------+------------+---------------+------------+
| credential             |          0 |    0.01562500 | 0.03125000 |
| domain                 |          1 |    0.01562500 | 0.01562500 |
| ec2_credential         |          0 |    0.01562500 | 0.00000000 |
| endpoint               |         18 |    0.01562500 | 0.01562500 |
| group                  |          0 |    0.01562500 | 0.01562500 |
| group_domain_metadata  |          0 |    0.01562500 | 0.01562500 |
| group_project_metadata |          0 |    0.01562500 | 0.01562500 |
| migrate_version        |          1 |    0.01562500 | 0.00000000 |
| policy                 |          0 |    0.01562500 | 0.00000000 |
| project                |          3 |    0.01562500 | 0.01562500 |
| role                   |          3 |    0.01562500 | 0.01562500 |
| service                |          6 |    0.01562500 | 0.00000000 |
| token                  |     152946 | 1098.00000000 | 0.00000000 |
| trust                  |          0 |    0.01562500 | 0.00000000 |
| trust_role             |          0 |    0.01562500 | 0.00000000 |
| user                   |          6 |    0.01562500 | 0.01562500 |
| user_domain_metadata   |          0 |    0.01562500 | 0.01562500 |
| user_group_membership  |          0 |    0.01562500 | 0.01562500 |
| user_project_metadata  |          6 |    0.01562500 | 0.01562500 |
+------------------------+------------+---------------+------------+
19 rows in set (0.07 sec)

多いな。

インデックスを確認してみる。

mysql> show index from token;
+-------+------------+----------+--------------+-------------+-----------+-------------+----------+--------+------+------------+---------+---------------+
| Table | Non_unique | Key_name | Seq_in_index | Column_name | Collation | Cardinality | Sub_part | Packed | Null | Index_type | Comment | Index_comment |
+-------+------------+----------+--------------+-------------+-----------+-------------+----------+--------+------+------------+---------+---------------+
| token |          0 | PRIMARY  |            1 | id          | A         |      145268 |     NULL | NULL   |      | BTREE      |         |               |
+-------+------------+----------+--------------+-------------+-----------+-------------+----------+--------+------+------------+---------+---------------+
1 row in set (0.17 sec)

idにしかふられてない。

こいつじゃないかなー。こいつっぽい気がするなー。
10万行超えるレコードを毎回フルスキャンは遅いんじゃないかなー。
expiresとvalidにも張っておいたほうがいいんじゃないかなー。

index作ってみる。

mysql> alter table token add index expires(expires);
Query OK, 0 rows affected (6 min 6.79 sec)
Records: 0  Duplicates: 0  Warnings: 0

mysql> alter table token add index valid(valid);
Query OK, 0 rows affected (2 min 59.38 sec)
Records: 0  Duplicates: 0  Warnings: 0

効果を確認。

mysql> explain SELECT token.id AS token_id, token.expires AS token_expires, token.extra AS token_extra, token.valid AS token_valid, token.user_id AS token_user_id, token.trust_id AS token_trust_id  FROM token  WHERE token.expires > '2013-05-27 06:11:45' and token.valid = 0;
+----+-------------+-------+------+---------------+-------+---------+-------+------+-------------+
| id | select_type | table | type | possible_keys | key   | key_len | ref   | rows | Extra       |
+----+-------------+-------+------+---------------+-------+---------+-------+------+-------------+
|  1 | SIMPLE      | token | ref  | expires,valid | valid | 1       | const |    4 | Using where |
+----+-------------+-------+------+---------------+-------+---------+-------+------+-------------+
1 row in set (0.02 sec)

mysql> SELECT token.id AS token_id, token.expires AS token_expires, token.extra AS token_extra, token.valid AS token_valid, token.user_id AS token_user_id, token.trust_id AS token_trust_id  FROM token  WHERE token.expires > '2013-05-27 06:11:45' and token.valid = 0;
Empty set (0.00 sec)

効いてる効いてる。

hoge@fuga:~$ top

top - 17:48:25 up 3 days,  1:07,  2 users,  load average: 0.16, 0.35, 0.61
Tasks: 144 total,   2 running, 142 sleeping,   0 stopped,   0 zombie
Cpu(s):  4.6%us,  1.0%sy,  0.0%ni, 93.9%id,  0.5%wa,  0.0%hi,  0.0%si,  0.0%st
Mem:   2050020k total,  1932860k used,   117160k free,    19116k buffers
Swap:  2097148k total,    52204k used,  2044944k free,   862236k cached

  PID USER      PR  NI  VIRT  RES  SHR S %CPU %MEM    TIME+  COMMAND
 1341 quantum   20   0  186m  39m 3732 S    4  2.0 104:51.66 python
 1996 rabbitmq  20   0 1132m 105m 1860 S    3  5.3 101:57.68 beam.smp
 1384 nova      20   0  226m  61m 3740 S    1  3.1  17:19.29 nova-conductor
 1345 cinder    20   0 91428  17m 3324 S    0  0.9  23:46.03 cinder-volume
 1436 mysql     20   0 1310m 185m 4196 S    0  9.3 105:59.44 mysqld
 2309 root      20   0 91016 4328 2116 S    0  0.2   0:05.59 apache2

load average下がった。

hoge@fuga:~$ sudo iotop

Total DISK READ:       0.00 B/s | Total DISK WRITE:       2.76 M/s
  TID  PRIO  USER     DISK READ  DISK WRITE  SWAPIN     IO>    COMMAND
 1739 be/4 mysql       0.00 B/s  769.22 K/s  0.00 %  0.82 % mysqld
  387 be/3 root        0.00 B/s   26.92 K/s  0.00 %  0.31 % [jbd2/dm-12-8]
 2079 be/4 mysql       0.00 B/s    3.85 K/s  0.00 %  0.03 % mysqld
22747 be/4 mysql       0.00 B/s    3.85 K/s  0.00 %  0.03 % mysqld
 1511 be/4 mysql       0.00 B/s    3.85 K/s  0.00 %  0.02 % mysqld
    1 be/4 root        0.00 B/s    7.69 K/s  0.00 %  0.00 % init

mysqlのIOも下がった。

hoge@fuga:~$ vmstat 1
procs -----------memory---------- ---swap-- -----io---- -system-- ----cpu----
 r  b   swpd   free   buff  cache   si   so    bi    bo   in   cs us sy id wa
 0  0  52328 130860  24160 847128    0    0  2140   139   15   38  6  1 51 41
 0  0  52328 130852  24160 847132    0    0     0     0  155  297  0  0 100  0
 0  0  52328 130852  24176 847116    0    0     0    52  368  664  2  1 97  0
 0  0  52328 130852  24192 847124    0    0     0   404  959 1834  8  1 91  1
 0  0  52328 130852  24240 847112    0    0     0  1628  598 1147  4  0 96  0
 0  0  52328 130844  24272 847156    0    0     0    64  386  744  2  1 97  0
 0  0  52328 130844  24288 847156    0    0     0    48  484  876  3  0 97  0
 0  0  52328 130844  24312 847160    0    0     0    76  524  991  3  1 96  0
 0  0  52328 130844  24328 847172    0    0     4    44  360  666  2  1 97  1
 0  0  52328 130844  24328 847192    0    0     0     0  151  289  0  0 100  0

waitも下がった。

これで管理画面も正常に動作するようになったよ!
2013.03.26

Haskell使ってWindows上でJISで書かれたファイルをSJIS(CP932)に変換して表示してみた

コードこんな感じ。

{-# LANGUAGE ImplicitParams #-}

import Prelude hiding (getContents,putStrLn,readFile)
import System.IO.Encoding
import Codec.Text.IConv
import Data.Encoding
import Data.Encoding.ISO2022JP
import Data.Encoding.CP932

main = do
    let ?enc = ISO2022JP
    s <- System.IO.Encoding.readFile "test.txt"
    let bs = Data.Encoding.encodeLazyByteString ISO2022JP s
    let sbs = Codec.Text.IConv.convert "ISO-2022-JP" "CP932" bs
    let ss = Data.Encoding.decodeLazyByteString CP932 sbs
    let ?enc = CP932
    System.IO.Encoding.putStrLn ss
    return ()

System.IO.EncodingのreadFile使ってISO2022JPで文字コードを指定して読み込み。
読み込んだ文字列をencodeLazyByteString使って文字コード指定してByteStringに変換。
convert使ってISO-2022-JPからCP932に変換。
convertの結果のByteStringをCP932の文字コードを指定してdecodeLazyByteStringでStringに変換。
最後にCP932の文字コードを指定してputStrLnで画面出力でCP932で出力できたよ。

Data.Encoding.CP932はまだ対応してなかったので実装した。
ついでにData.Encoding.SJISもコード表作ってみた。
そのうち本家に取り込むかpatch載せるかしよう。

======
2013/5/28 追記

これを本家に突っ込むほどのモチベーションが沸かなかったので
とりあえずpatchの直リン貼り。
encoding-0.6.7.2へのpatchファイルになってます。
https://raw.github.com/endhrk/encoding/master/encoding.diff

======
2016/8/23 追記

このパッケージをまた使うことになりいよいよ面倒なので本家にパッチを送信。
encoding-0.8.1で取り込まれました。
https://hackage.haskell.org/package/encoding

2013.03.25

HaskellのSystem.IO.EncodingをWindowsにインストールしようとしてハマった

色々遠回りしてるので、先に結論書いときます。

$ cabal install encoding -f-systemEncoding

これで行けます。

環境はこんな感じ

  • mingw32
  • ghc 7.4.2
  • cabal 1.14
  • encoding 0.6.7.2

以下試行錯誤の経過。

普通にcabalでインストールしようとしてみると怒られた。

$ cabal install encoding

<中略>
Configuring encoding-0.6.7.2…
setup.exe: Missing dependency on a foreign library:
* Missing (or bad) header file: system_encoding.h
This problem can usually be solved by installing the system package that
provides this library (you may need the “-dev” version). If the library is
already installed but in a non-standard location then you can use the flags
–extra-include-dirs= and –extra-lib-dirs= to specify where it is.
If the header file does exist, it may contain errors that are caught by the C
compiler at the preprocessing stage. In this case you can re-run configure
with the verbosity flag -v3 to see the error messages.
cabal.exe: Error: some packages failed to install:
encoding-0.6.7.2 failed during the configure step. The exception was:
ExitFailure 1

よくわからないので “-v3” を付けて再実行。

$ cabal install encoding -v3

<中略>
ExitFailure 1 with error message:
In file included from C:\DOCUME~1\hoge\LOCALS~1\Temp\1\23868.c:1:0:
./system_encoding.h:4:22: fatal error: langinfo.h: No such file or directory
compilation terminated.
setup.exe: Missing dependency on a foreign library:
* Missing (or bad) header file: system_encoding.h
This problem can usually be solved by installing the system package that
provides this library (you may need the “-dev” version). If the library is
already installed but in a non-standard location then you can use the flags
–extra-include-dirs= and –extra-lib-dirs= to specify where it is.
If the header file does exist, it may contain errors that are caught by the C
compiler at the preprocessing stage. In this case you can re-run configure
with the verbosity flag -v3 to see the error messages.
World file is already up to date.
cabal.exe: Error: some packages failed to install:
encoding-0.6.7.2 failed during the configure step. The exception was:
ExitFailure 1

langinfo.h が見つからないらしい。

GnuWinのLibGW32Cに入ってたのでこいつをインストール。
http://gnuwin32.sourceforge.net/packages/libgw32c.htm
※インストーラ付きはこっち -> http://gnuwin32.sourceforge.net/downlinks/libgw32c.php

headerファイルの場所を指定して再度インストール。

$ cabal install encoding –extra-include-dirs=”C:\Program Files\GnuWin32\include\glibc”

<中略>
Data\Encoding.hs:0:4: lexical error (UTF-8 decoding error)
cabal.exe: Error: some packages failed to install:
encoding-0.6.7.2 failed during the building phase. The exception was:
ExitFailure 1

文字コードがなんか駄目らしい。

応急処置。

$ export LANG=C

もいっかい実行。

$ cabal install encoding –extra-include-dirs=”C:\Program Files\GnuWin32\include\glibc”

<中略>
Registering encoding-0.6.7.2…
Installing library in C:\Documents and Settings\hoge\Application
Data\cabal\encoding-0.6.7.2\ghc-7.4.2
Registering encoding-0.6.7.2…

やっと通った。

しかしSystem.IO.Encodingを使うプログラムコンパイル時にリンクエラー。

$ ghc test.hs
[1 of 1] Compiling Main ( test.hs, test.o )
Linking test.exe …
C:\Documents and Settings\hoge\Application Data\cabal\encoding-0.6.7.2\ghc-7.
4.2/libHSencoding-0.6.7.2.a(system_encoding.o):system_encoding.c:(.text+0x22): u
ndefined reference to `nl_langinfo’
collect2: ld returned 1 exit status

あらためて色々確認。
http://hackage.haskell.org/packages/archive/encoding/0.6.7.2/doc/html/System-IO-Encoding.html
System.IO.Encodingのドキュメントを見ると…

Returns the encoding used on the current system. Currently only supported on Linux-alikes.

Linuxだけしかサポートしてないよ!

CHANGELOGファイルを見ると…
http://code.haskell.org/encoding/CHANGELOG

add -systemEncoding flag for Windows builds

Windows用にsystemEncodingを無効にするフラグが付いている!

ちゃんとドキュメント見てない僕が悪かったんや…

ということでWindowsでSystem.IO.Encodingを使いたい時は

$ cabal install encoding -f-systemEncoding

でした。

遠回りしすぎた…

2012.08.01

Amazon EC2のWindows Installメディアの場所

Configuring Windows Components on Amazon EC2
http://aws.amazon.com/articles/1802

見つかりにくいのでメモメモ。

Next »