2013.07.18

今度こそUbuntu 64bit で Canon IR5055N を使いつつ今度はセキュアプリントも使う

過去にUbuntu 64bit で Canon IR5055N を使うでプリンタドライバのインストールを書きましたがたぶん色々間違ってました m(. . )m

その後検証したところによるとmakeではインストールされるライブラリが足りないため
cndrvcups-lips4.specを読んで必要な処理を手動で行う必要があったようです。

ただそれも今となっては過去の話。
LIPS4(LIPSLX) Printer Driver for Linux Version 2.60 ではrpmだけではなく64bit Debianパッケージも同梱されています。

ということで必要なパッケージをダウンロードしてインストール。
LIPS4 Printer Driver for Linux Version 2.60 32bit
LIPSLX Printer Driver for Linux Version 2.60 64bit
LIPS4 Printer Driver for Linux Version 2.60 64bit

僕は今回 LIPSLX Printer Driver for Linux Version 2.60 64bit を使ったのでその前提で進めます。
※LISPLXの場合ドライバ検索でiR5055が自動でヒットしたのでこちらを使いました。

$ tar xzvf llinux-lips4-printerdriver64-v260.tar.gz
$ cd linux-lipslx-printerdriver64-v260/64-bit_Driver/Debian/
$ sudo dpkg -i cndrvcups-common_2.60-1_amd64.deb cndrvcups-lipslx_2.60-1_amd64.deb
Selecting previously unselected package cndrvcups-common.
(Reading database ... 323489 files and directories currently installed.)
Unpacking cndrvcups-common (from cndrvcups-common_2.60-1_amd64.deb) ...
Selecting previously unselected package cndrvcups-lipslx.
Unpacking cndrvcups-lipslx (from cndrvcups-lipslx_2.60-1_amd64.deb) ...
Setting up cndrvcups-common (2.60-1) ...
Setting up cndrvcups-lipslx (2.60-1) ...

完了です。
あとは
[System Settings] -> [Printers] -> [Add]
でプリンタをインストールしてあげてください。

ちなみにCanon IR5055Nは対応プロトコルとして下記が記載されていました。

TCP/IP(LPD/Port9100/WSD/IPP/IPPS/SMB/FTP)、IPX/SPX(NDS、Bindery)、AppleTalk

なのでネットワークプリンタの場合IPを指定して検索すると
「App Socket/HP JetDirect」が選択されPortNumber 9100がデフォルトで入力されますが
この設定がこのまま使えるようです。
プリンタの追加
あとは「次へ」押したり名前つけたりしてあげるとインストール完了です。


ここからはついでのセキュアプリント。

まずはプリンタのプロパティを開きます。
[System Settings] -> [Printers] -> 作成したプリンタ右クリック -> [Properties]
左の項目から”Printer Options”を選択し、右画面を一番下までスライドさせて
[Job Execution Mode] -> “Secured Print”を選択
Printer Properties

プロパティ変更後コマンドラインから下記コマンドを実行することでプリンタの設定画面が開きます。

$ cngplp

cngplp
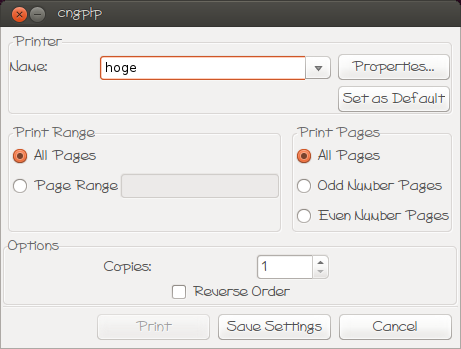
[Properties] -> [Device Settings] を開いていき
[Output Method] -> “Secure Print”を選択
[Settings]をクリックするとユーザ名とパスワードを入力する画面が出てきます。
Secured Print Settings

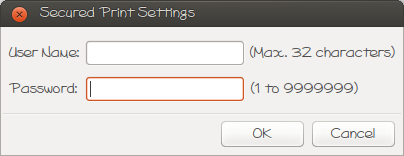
ここでユーザ/パスを設定してアプリケーションから印刷を行えば、セキュアプリントを利用することが可能でした。

今度こそ大丈夫。

2013.06.06

Ubuntu 12.04にZabbix 2.0をインストールしてみた

参考サイト https://www.zabbix.com/documentation/2.0/manual/installation/install
Package Download http://www.zabbix.com/download.php

Ubuntu 12.04 ServerにZabbix 2.0.6をインストールしましたメモ。

基本的にはインストールドキュメントの通り。
パッケージは10.04版しか見つからなかったのでソースからインストールしました。

まずはダウンロードと展開。

$ wget -P /tmp http://downloads.sourceforge.net/project/zabbix/ZABBIX%20Latest%20Stable/2.0.6/zabbix-2.0.6.tar.gz
$ cd /opt
$ tar xzvf /tmp/zabbix-2.0.6.tar.gz
$ ln -s /opt/zabbix-2.0.6 /opt/zabbix

コンパイル用にgcc、DBにはMySQLを使うのでインストール。

$ sudo apt-get install gcc mysql-server

configureを実行。

$ ./configure --enable-server --enable-agent --with-mysql --with-net-snmp --with-libcurl

するとmysql_configが足りないって言われる。

そんな子どこにいるのかわからないのでauto-aptで探してみてインストール。

$ apt-get install auto-apt
$ sudo auto-apt update
$ auto-apt search mysql_config
usr/bin/mysql_config_pic    libdevel/libmysqld-pic
usr/bin/mysql_config    libdevel/libmysqlclient-dev
$ sudo apt-get install libmysqlclient-dev

2回目のconfigure

$ ./configure --enable-server --enable-agent --with-mysql --with-net-snmp --with-libcurl

今度はcurl-configが足りないって言われる。

検索、そしてインストール。

$ auto-apt search curl-config
usr/bin/flickcurl-config    universe/libdevel/libflickcurl-dev
usr/bin/curl-config libdevel/libcurl4-gnutls-dev,libdevel/libcurl4-nss-dev,libdevel/libcurl4-openssl-dev
$ sudo apt-get install libcurl4-openssl-dev

3回目のconfigure

$ ./configure --enable-server --enable-agent --with-mysql --with-net-snmp --with-libcurl

次はnet-snmp-configが足りないって言われる。

検索、そしてインストール。

$ auto-apt search net-snmp-config
usr/bin/net-snmp-config libs/libsnmp15
$ sudo apt-get install libsnmp15

4回目のconfigure

$ ./configure --enable-server --enable-agent --with-mysql --with-net-snmp --with-libcurl
[中略]
checking for main in -lnetsnmp... no
configure: error: Not found NET-SNMP library

次はnetsnmpのライブラリが無いって言われる。

こいつは勘でインストール。

$ sudo apt-get install libsnmp

5回目のconfigure

$ ./configure --enable-server --enable-agent --with-mysql --with-net-snmp --with-libcurl
[中略]
***********************************************************
*            Now run 'make install'                       *
*                                                         *
*            Thank you for using Zabbix!                  *
*              <http://www.zabbix.com>                    *
***********************************************************

通った。

$ make
$ sudo make install

通った。

DBの作成。

$ mysql -u root -p <<EOF
> create database zabbix character set utf8;
> EOF
$ mysql -u root -p zabbix < database/mysql/schema.sql
$ mysql -u root -p zabbix < database/mysql/images.sql
$ mysql -u root -p zabbix < database/mysql/data.sql

zabbixサーバのDB接続情報設定の変更。

$ sudo vim /usr/local/etc/zabbix_server.conf

DBUser=root
DBPassword=password        <-- DBサーバに設定したrootのパスワードを指定

管理画面となるWEBのインストール。

$ sudo apt-get install apache2 libapache2-mod-php5
$ mkdir /var/www/zabbix
$ cd frontends/php $ cp -a . /var/www/zabbix

ブラウザでzabbixの画面を開いてみて確認。
-> http://zabbix/pre-requisites
初期設定画面で設定変更が必要な箇所がわかるのでそれぞれ修正。
僕が変更したのは以下。

$ sudo vim /etc/php5/apache2/php.ini

post_max_size = 16M
max_execution_time = 300
max_input_time = 300
data.timezone = Asia/Tokyo

$ sudo apt-get install php5-mysql
$ sudo apt-get install php5-gd

$ sudo service apache2 reload

これでリロードすれば全部OKになった。
ならない人は必要に応じて追加で設定/インストールどうぞ。

初期設定画面の最後まで行くとconfigファイルの画面が出てくるので
ダウンロードしてzabbixサーバの/var/www/zabbixにコピー。

とりあえずここまでで起動完了。

==================================================
ついでに日本語化の方法。

$ sudo locale-gen ja_JP.UTF-8
$ cd /var/www/zabbix/locale
$ ./make_mo.sh

zabbixの管理画面の[profile]からlanguageを変更して完了。

==================================================
おまけにその他ノードにエージェントだけ追加したい場合。

$ wget -P /tmp http://downloads.sourceforge.net/project/zabbix/ZABBIX%20Latest%20Stable/2.0.6/zabbix-2.0.6.tar.gz
$ cd /opt
$ sudo chmod o+w .
$ tar xzvf /tmp/zabbix-2.0.6.tar.gz
$ ln -s /opt/zabbix-2.0.6 /opt/zabbix
$ cd zabbix/
$ sudo apt-get -y install gcc
$ ./configure --enable-agent
$ make
$ sudo make install
$ sudo sed  -i -e 's/Server=127.0.0.1/Server=[server-ip-address]/' /usr/local/etc/zabbix_agentd.conf
$ zabbix_agentd

以上!

2012.04.27

Ubuntu 12.04 にnvidiaな環境でデュアルモニターの設定

$ nvidia-settings
もしくは
Unity Launcherから[NVIDIA X Server Settings]
を実行。

  1. [X Server Display Configration] -> [Configuration] を [TwinView] に変更。
  2. 2台目モニターの [Resolution] を [Off] から [Auto] に変更。
  3. [Apply] で適用。
  4. [Save to X Configuration File] で設定の保存。
  5. [/etc/X11/xorg.conf] -> [Save] ファイルを指定して保存。
  6. 再起動。

<<おまけ>>
画面間のカーソル移動時の引っ掛かりを止めたい
[System Settings] -> [Displays] -> [Sticky edges] を [OFF] に変更。
[Apply] -> [Keep This Configuration] で設定を保存。

サブディスプレイの Unity Launcher を消したい
$ gconf-editor
もしくは
Unity Launcherから[Configuration Editor]
を実行。
/apps/compiz-1/plugins/unityshell/screen0/options/num_launchers
の値を [0] から [1] に変更。

2012.04.08

Ubuntu 11.10 に samba4 をインストールできない

今のところUbuntu 11.10にapt-getでsamba4をインストールしようとするとエラーが出るのでその対策。

インストール時に出るエラーはこんな感じ。

$ sudo apt-get install samba4
Reading package lists… Done
Building dependency tree
Reading state information… Done
Suggested packages:
bind9 phpldapadmin samba-gtk swat2
Recommended packages:
samba4-dsdb-modules
The following NEW packages will be installed:
samba4
0 upgraded, 1 newly installed, 0 to remove and 0 not upgraded.
Need to get 0 B/1,623 kB of archives.
After this operation, 11.7 MB of additional disk space will be used.
Preconfiguring packages …
Selecting previously deselected package samba4.
(Reading database … 278638 files and directories currently installed.)
Unpacking samba4 (from …/samba4_4.0.0~alpha17~git20110807.dfsg1-1ubuntu1_amd64.deb) …
Processing triggers for man-db …
Processing triggers for ureadahead …
Setting up samba4 (4.0.0~alpha17~git20110807.dfsg1-1ubuntu1) …
Administrator password will be set randomly!
ProvisioningError: guess_names: ‘realm =’ was not specified in supplied /etc/samba/smb.conf. Please remove the smb.conf file and let provision generate it
dpkg: error processing samba4 (–configure):
subprocess installed post-installation script returned error exit status 1
Errors were encountered while processing:
samba4
E: Sub-process /usr/bin/dpkg returned an error code (1)

smb.confがうまく作れないらしい。

原因はドメイン情報が無い時によろしくやってくれないバグのようです。
https://bugs.launchpad.net/ubuntu/+source/samba4/+bug/832465

なのでそのうち直るはずだけど、とりあえずバグ報告のところに書いてあった対策をすればインストールはできたのでその手順を書きます。

  1. /etc/hosts にドメイン情報を付加
  2. $ cat hosts
    127.0.0.1 localhost
    127.0.1.1 blog

    こんな感じになってるやつを変更。

    $ sudo vim /etc/hosts
    127.0.0.1 localhost.localdomain localhost
    127.0.1.1 blog.kirie.net blog

  3. /etc/hostname にドメイン情報を付加
  4. $ sudo vim /etc/hostname
    blog.kirie.net

  5. ネットワークインタフェースの再起動
  6. $ sudo /etc/init.d/networking restart

この状態でsamba4をインストールするとエラーなくインストールできました。

$ sudo apt-get install samba4
Reading package lists… Done
Building dependency tree
Reading state information… Done
〜〜〜中略〜〜〜
Unpacking samba4 (from …/samba4_4.0.0~alpha17~git20110807.dfsg1-1ubuntu1_amd64.deb) …
Processing triggers for man-db …
Processing triggers for ureadahead …
Setting up samba4 (4.0.0~alpha17~git20110807.dfsg1-1ubuntu1) …
samba4 start/running, process 22135

2012.03.08

Ubuntu 11.10 で Unity のうにょーんを止める方法

画面の左端で自動で出たり引っ込んだりしてるやつがイヤだ!

  1. Ubuntu Software Centerで「CompizConfig Settings Manager」を検索しインストール。
  2. インストールしたCompizConfig Settings Managerを起動。
  3. デスクトップカテゴリの「Ubuntu Unity Plugin」を選択。
  4. Behaviourのタブで「Hide Launcher」を「Never」に変更。
  5. Experimentalタブを選択
  6. 「Launcher icon size」を左端に設定(なるべく小さいほうが邪魔にならないので。大きさはお好みで)
  7. CompizConfig Settings Managerを終了して完了

これで落ち着いて作業ができます。

2012.02.21

Ubuntu 11.10 でDVD見る

たぶんデフォルトで入っている libdvdread4 がインストールされていることを確認する。

$ dpkg -l libdvdread4

※もし入ってなかったらインストール。

$ sudo apt-get install libdvdread4

インストールスクリプトを実行。

$ sudo /usr/share/doc/libdvdread4/install-css.sh

これで見れるようになるはず。

2011.10.28

Ubuntu 11.10 でAlt+TabのApplication切り替えをWindow切り替えにしたい

Ubuntu 11.10でWindowの切り替えにAlt+Tabを使うと
Applicationの切り替えになってしまい
複数Terminalを切り替えながら使っている僕としては非常に使いづらい。

ということでAlt+TabでWindowごとに切り替える方法。

  1. Ubuntu Software Centerで「CompizConfig Settings Manager」を検索しインストール。
  2. インストールしたCompizConfig Settings Managerを起動。
  3. デスクトップカテゴリの「Ubuntu Unity Plugin」を選択。
  4. Switcherタブを選択。
  5. 「Key to start the switcher」と「Key to start the switcher in reverse」をDisabledに変更。
  6. 「Back」で戻る。
  7. Window Managementカテゴリの「Application Switcher」を選択。
  8. 「Enable Application Switcher」にチェックを付けて完了。

これでなんとかWindow単位で切り替えできるようになった。
ただなんか、いらないアニメーションのせいで切り替えが重い。

アニメーション止めるのはどこかなぁ。

2011.10.16

Ubuntu 11.10 で Unity の F10 対策

11.04に引き続き11.10でも日本語入力変換のF10がUnityに奪われて使えない。
その対策。

  1. Ubuntu Software Centerで「CompizConfig Settings Manager」を検索しインストール。
  2. インストールしたCompizConfig Settings Managerを起動。
  3. デスクトップカテゴリの「Ubuntu Unity Plugin」を選択。
  4. Behaviourタブの「Key to open the first panel menu」を無効にする。

Ubuntu 11.10 で表示フォントの変更

11.04では外観の設定でフォント等も設定できてたんだけど
今回外観の設定では壁紙くらいしか変更できないみたい。

フォントを変更するには
Ubuntu Software Centerを開いて
「Advanced Settings」を検索してインストール。
もしくは

$ sudo apt-get install gnome-tweak-tool

Advanced Settingsを実行すればデスクトップの表示項目やテーマやフォントの設定変更ができる。

Ubuntu 11.04 から Ubuntu 11.10 へアップグレード

起動したら出てきたアップグレードの催促画面からボタンをクリックしてアップグレード。
そして失敗。

起動しなくなった。
こんなエラー。

unable to connect to system bus: Failed to connect to socket /var/run/dbus/system_bus_socket: Connection refused
〜中略〜
Waiting for network configuration
Waiting for up to 60 more seconds for network configuration

リリースノートによると
https://wiki.ubuntu.com/OneiricOcelot/ReleaseNotes/ja

VMWare Workstation 8 または VMWare Playerのユーザーは、起動時に問題にあう可能性があります。(858122)

と、ある。
VMWare Player入れてたから、たぶんこれ踏んだ。

Ubuntu 11.10では /var/run、/var/lock、/dev/shm が移動となり、代わりにそれぞれ/run、/run/lock、/run/shmを使用するようになりました。

と、今回かなり大きな変更点があるので
インストールしてるアプリにかなり注意が必要。

http://linux.ikoinoba.net/index.php?UID=1318602091
このブログに書いてあった
直るかもしれないコマンドを試してみたけど起動せず。

/var/runの中身を/runにコピーしたところなんとか起動した。
けど、起動中に2分くらい処理待ちで止まる感じ。

諦めて新しいSSD買ってきて11.10をきれいにインストールしなおして終了。

アップグレードはリリースノートをちゃんと読もう。

Next »